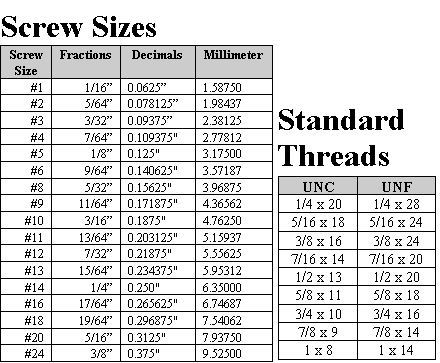
Thread designation with screw size
Unified thread designation
1/4-20 UNC-2A
- 1/4 – the nominal diameter, also the major / largest diameter
- 20 – the number of threads per inch
- UNC – UNC = Unified Coarse, UNF = Unified Fine. . The only difference is that the vallies (roots) of external R threads have a mandatory rounded shape, whereas with the UNC and UNF threads the roundness is optional.
- 2A – This represents the tolerance / fit of the thread. There are 6 common options, 1A, 2A, 3A, 1B, 2B, and 3B. A=external, B=internal. 1 is the loosest fit, 3 is the most precise and tightest fit with potentially zero clearance. If the tolerance isn’t specified, chances are it’s the more common 2A or 2B designation. 1 is hardly used, and only in cases where frequent re-assembly is needed or the threads need to work even with significant damage.
ISO Metric thread designation:
M6 x 1 -4g6g or M6-6g
- M6– M is for metric, 6 is the major diameter and nominal size in mm
- x 1 – Pitch. Note that this is different from how Unified threads are specified. UN threads write the number of threads per inch after the nominal size,
- 4g6g – This is the tolerance / fit class. The number refers to a manufacturing tolerance window, higher numbers are “sloppier.” The letter places that tolerance window relative to the ideal thread. Capital letters refer to internal threads, lowercase external. An h/H has the least amount of allowance–ie, there could be no clearance. g/G and lower represent more allowance. The two number Letter pairs apply to pitch grade/tolerance and major diameter grade/tolerance for external threads, pitch and minor diameter for internal threads. When only one pair is present (as in M6-6g) it applies to both pitch and major/minor dia.

